It’s now time to look at how we can add our own modules. If you look inside the app/code folder, you will notice straight away that there are no code pools. No community, core, or local. In Magento 2, code pools are no longer required. While working on Magento 2 modules we need to get into the mind-set that a module should be self-contained and implement a full feature. In Magento 1, it was easy to share features between modules as there was no real way of enforcing otherwise. We could push logic into the theme directories and before we knew it, what started as a single module became intertwined into many. Magento 2 brings all of the required files within a single namespace as well as dependencies managed via Composer. Try to think of a module as doing just one thing, and that one thing well. So let’s get started by creating our first module folder and we will explain some of the folders that we will need and their purpose in Magento 2. Create a new folder within app/codecalled PocketGuide/Generators. The full path for this should look like the following:app/code/PocketGuide/Generators. 1.1. Module configuration The first folder we will need is the age old etc folder. As in Magento 1, this folder is used to configure the module. There are more additions in Magento 2, such as the di.xml file that we will see shortly, but let’s start by creating a new folder etc. Within this, we need to create our module’s configuration file, module.xml. Within our XML document we need to define the XML version, so let’s add  Next up, we want to include the path to the XSD file, which validates our document:
  If we use a modern IDE, this XSD file will be included by the IDE and will validate the XML we are creating and warn us earlier of potential errors. It also has the added benefit of providing autocomplete for the XML document. The next line we need to add will define our module’s name and its version number. This will be used by Magento to process install or upgrade scripts.
 ![]() While we are looking at version numbers, I would like to introduce you to Semantic Versioning (Semver). We often see version numbers as just numbers, but they are lots more. A version number can indicate its stability and a module’s upgrade path. You can read more via the official website, but Semver uses:
While we are looking at version numbers, I would like to introduce you to Semantic Versioning (Semver). We often see version numbers as just numbers, but they are lots more. A version number can indicate its stability and a module’s upgrade path. You can read more via the official website, but Semver uses:
- Major– A feature complete new release. Can introduce breaking changes between major releases 16
- Minor – Non-breaking changes and small incremental updates in functionality
- Patch– Bug fixing
Semantic Versioning is being widely adopted both within the Magento 2 core and the wider software community so it is beneficial to know and use this practice. Other benefits include an understandable versioning system that is portable between projects, Visibility of backwards compatibility breaks as well as clear visibility of minor and major release versions. To return to the tutorial, you now need to close the opening config node. ![]() The complete file should look the same as below:
The complete file should look the same as below:  Now we have our module configured and registered, let’s take a look at what folders we can expect to see in a Magento 2 module. 2. API The API folder is a new addition to Magento 2. Magento 2 now supports and encourages developers to create interfaces. Interfaces or Service Contracts in Magento 2 language are used to define the public API of a class. This is a really important addition to Magento, as not only do interfaces help us with testing, but it also makes developers think about backward compatibility breaks within modules. What do I mean here? Well, if we create an interface with well-defined public methods, any other module can rely on these to work. In our module we can modify the behaviour without having to change the public methods. All of the Magento 2 modules have Service Contracts and they are used extensively throughout the code. If we look at the CMS module there is a BlockRepositoryInterface that defines how we can perform basic CRUD on blocks:
 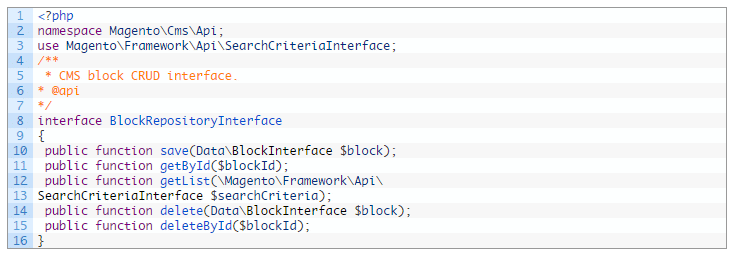 3. Block Just as the name suggests, here are the block classes that will be our layer between the back-end and the front-end. This folder is used again for both front-end blocks and adminhtml blocks. 4. Controller Controllers are where we convert a request into a response. They work a little differently to how they are used in in Magento 1, and this is an area we will explore lots more when we get around to implementing front-end and admin routes. 5. etc We have already had a quick look at this folder. However, there is much more to it than just module.xml. We can configure our dependency injection, adminhtml configuration, and front-end configuration, as well as lots, lots more. We will look at each of these in more depth through the course of these guides. 6. Helper Just like in Magento 1, this is the folder where we place all of our general purpose helpers than can be called from any location. 7. il8n Module-specific translations should be placed in this folder. That way, on a per-installation basis, they can be modified globally. 8. Model Models have changed considerably in Magento 2, but that is for another guide. For now, all we need to know is that models are used for data modelling. 9. Test All good modules need tests and they should be in the module’s folder so they can be run against any build. This folder includes the unit integration and, where possible, functional tests. Magento 2 comes with lots of tests that can be used for reference and, with the use of Dependency Injection, it makes using testing frameworks more attainable. 10. Setup The install and upgrade process in Magento 2 is different than Magento 1. For now just know that if you want to run scripts to install or upgrade both data and schemas, they are placed in here. 11. View This folder is new for Magento 2. In Magento 1 we were used to adding our view files or template in the base or theme directory. However, in Magento 2 we place our templates, JS and CSS (LESS) with the module, so there is no longer a complex process of distributing modules. However, theme-specific changes are still added within the app/design folder. This is only used for setting some default templates/ styles when distributing our modules. 12. Composer.json Not all modules will require a composer.json file. If you never plan on using this module on any other project, it is fine to omit it. However, this file is used by Composer to install the module and, with Magento 2, it contains extra information that tells Magento how to install the module. Note: If you never want to distribute your module, but your module depends on packages from Packagist, then you still need a composer.json file to manage the modules dependencies. So now we know what a Magento 2 module looks like. We have configured our module with a module.xml file, so now it is possible for Magento 2 to know that our module exists. If we ran php bin/magento setup:upgrade from the environment we have configured, we should see our module name listed in the output.
